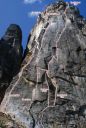
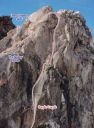
Thin Red Line, Liberty Bell V 5.10a C2+ |
||
North Cascades, Washington, USA | ||
|
Avg time to climb route: 1-2 Days
Approach time: 1 hour Descent time: 2-4 hours Number of pitches: 12 Height of route: 1,200' Overview
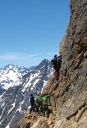
Just to the right of Liberty Crack, Thin Red Line takes a more direct line straight up the East Face of Liberty Bell. With substantially more aid climbing, this is Washingtons most classic big wall. Eight pitches of mostly aid climbing on excellent rock, take the climber to the sloping M&M ledge the first okay bivy on the wall. From here another few pitches of highly enjoyable free-climbing reach the summit.
Photos
- View all 1 photos of Thin Red Line as: Thumbnails | Slideshow
Climber Beta on Thin Red Line
Find other routes like
Thin Red Line
Route History
With The Liberty Crack going up in 1964, and the Independent route in 1966, climbers continued to wonder about the possibility of other big wall routes on the amazing East Face of Liberty Bell. Soon after the Liberty Crack route was first climbed, the first-ascent master, Fred Beckey, spotted a possible route right up the center of the face. He staked his claim to the line by climbing up and fixing a rope on Pitch 1.Alex Bertulis said, Beckey had ropes hanging from various climbs all over the Northwest, staking his claim to the route and other climbers were getting annoyed. Hanging his rope should have kept other climbers off and laid his claim to the route, but that year Beckey hung ropes all over the Cascades and then went off to climb in Alaska for more than a month. On their first attempt up the center of the face, Don McPherson and Ron Burgner cut Beckeys rope from the face. At first, they were quiet about it, worried about the fallout but word spread like lightning through the climbing community; everyone wondered who cut it. Bertulis said the reaction was such surprise, My God, this was Fred Beckeys rope! But after the incident Fred Beckey never hung another rope. On their second attempt, McPhersons back went out and the pair had to bail. Burgner and McPherson hobbled out and blamed it on bad karma from the Great One. The pair didnt get another attempt because in July of 1967 two local rock masters, Jim Madsen and Kim Schmitz, had a go at the route. Schmitz is a strong climber from Portland, Oregon. Jim Madsen, who is often considered one of the most significant climbers from this era, was a UW engineering student and football player. The pair hiked in and started up the wall, They took three days to complete their route, topping out in the afternoon of their third day. When picking a name for the route, Schmitz and Madsen chose not to follow the Revolutionary theme and named their route The Thin Red Line because of its sustained and difficult nature. The following year the duo completed an early and fast two-bivouac ascent of the Nose, blisteringly fast for the time. In October 1968 Madsen rappelled off the end of his Gold Line rope while attempting to rescue his friends Chuck Pratt and Chris Fredericks, pinned down by a storm on Dihedral Wall, perishing in the 2,500-foot fall. Steve Marts went on to claim the first ascent of two more of the 50 Classic Climbs of North America besides Liberty Crack. He also climbed The Northeast Buttress of Slesse and the North Ridge of Mt. Stuart. Free History Mikey Schafer long considered the possibility of free climbing the Thin Red Line. In the summer of 2008, he decided to finally take a serious look. He mostly soloed the route, then fixed ropes from the top of Pitch 6 to work the moves on the most difficult pitches. After spending a few days working on the route on a mini traxion, he discovered a small, super technical variation on steep slab around the pendulum at the start of Pitch 5. A week later, Schafer came back with Kate Rutherford. They spent one day top roping it and then sent the route in a single push the following day, originally rating it V 5.12c. As it has cleaned up it is now considered 5.12b. In late August of 2011 Max Hasson and Jens Holsten became the first climber to link up The Thin Red Line and Liberty Crack in a single day. There were four more bolts placed on the free variation on Pitch 5. Several pitons were fixed to increase safety for free climbers. Mikey Schafer requests aid climbers leave these in place for free climbers and to allow the route to be aided cleanly to preserve the rock. Currently, a climber can simply walk up to the route and safely climb it. However, Schafer acknowledges it will be up to the traditionalists to decide if they can tolerate both safe free climbing and clean aid climbing on this classic line. Strategy
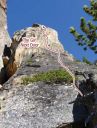
The Thin Red Line is more famous than it is popular, making it unlikely youll have to share the route even on the busiest weekends. Slower parties can take three days. On Day 1, hike loads and fix two ropes on the first two pitches. On Day 2, climb to Pitch 8 and sleep on M & M ledge, before topping out on Day 3.Hauling the first eight pitches is easy, but hauling on the last four pitches is challenging. The final 300 vertical feet above the last pitch is exposed mostly 3rd and sometimes 4th class climbing. Go light enough that you dont have to haul and you can carry your gear on your back when you scramble up this final stretch. Faster parties taking two days often fix to the top of Pitch 4 with three ropes and then blast to the top the next day. Alternatively, they may climb to Pitch 8, bivi on M & M ledge the first night and then top out on Day 2. Keep in mind that M & M ledge is a large but sloping sandy ledge that is a poor bivi for three. Only a fit and competent party can complete this route in a single day. Every so often a few parties climb this route full on big wall style and use portaledges on the route. They either just climb up to Pitch 8 and rap, or leave their haul bags at M & M ledge climb to the top and then rap. There arent consistently fixed anchors at every station, so be prepared to leave gear for either of these option. To start The Thin Red line, it is best to begin on the Pitch 1 of Freedom or Death (5.10a and C1 or 5.10c), rather than the traditional 5.8 traverse pitch. The left-hand Freedom or Death start is harder but much more straightforward and better protected with nicer rock than the right-hand 5.8 option, which is not recommended. It is debatable if Pitch 2 or Pitch 5 is the crux. Pitch 2 might score you a bigger fall at the wrong point, and it does go straight from its C3/A2+ crux to mandatory but fairly secure 5.7 free climbing. Pitch 5, however, Faster parties taking two days often fix to the top of Pitch 4 with three ropes and then blast to the top the next day. Alternatively, they may climb to Pitch 8, bivi on M & M ledge the first night and then top out on Day 2. Keep in mind that M & M ledge is a large but sloping sandy ledge that is a poor bivi for three. Only a fit and competent party can complete this route in a single day. Every so often a few parties climb this route full on big wall style and use portaledges on the route. They either just climb up to Pitch 8 and rap, or leave their haul bags at M & M ledge climb to the top and then rap. There arent consistently fixed anchors at every station, so be prepared to leave gear for either of these option. To start The Thin Red line, it is best to begin on the Pitch 1 of Freedom or Death (5.10a and C1 or 5.10c), rather than the traditional 5.8 traverse pitch. The left-hand Freedom or Death start is harder but much more straightforward and better protected with nicer rock than the right-hand 5.8 option, which is not recommended. It is debatable if Pitch 2 or Pitch 5 is the crux. Pitch 2 might score you a bigger fall at the wrong point, and it does go straight from its C3/A2+ crux to mandatory but fairly secure 5.7 free climbing. Pitch 5, however, is sustained and tricky right from the start with a pendulum to a 5.9 mantel, but its never dangerous. Pulling both roofs is involved, and strenuous but the second roof is the definitive crux of this pitch. The tenuous nature and the wicked steep climbing on Pitch 5 add to the difficulty both mentally and physically. This route regularly gets climbed clean but does depend on a lot of fixed gear. Plan to bring a hammer and a few sawed angles, but strive to minimize the hammer use to protect the route for future generations. Retreat Storm
There are fixed anchors on the first four pitches that facilitate straightforward rappelling using two 60m ropes. If retreating from the top of Pitch 5, you might have to do some down aiding to reverse the double roofs. From Pitch 6 and above, retreating requires leaving gear because of the lack of fixed anchors. The lower part of the route is steeper than it looks and will stay dry even in a light rainstorm. The last four pitches are lower angle and run with water during or after a storm. These upper pitches also hold snow, making climbing them nearly impossible early or late in the season or after a storm.
Everything You Need to Know About
North Cascades
Search the internet for beta on
Thin Red Line
|
 Liberty Bell Thin Red Line Photo: Mark Allen
Other Routes on Liberty Bell
|