Direct East Buttress, South Early Winters Spire IV 5.11a or 5.10a C0 |
||
Washington Pass, Washington, USA | ||
|
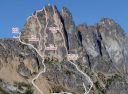
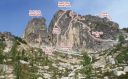
Avg time to climb route: 4-7 hours
Approach time: 1.5-2.5 hours Descent time: 1.5-2.5 hours Number of pitches: 10 Height of route: 1,100' Overview
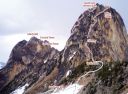
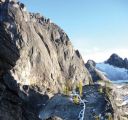
The Direct East Buttress (DEB) is a must- do route at Washington Pass. Park at the hairpin and look up at this amazing feature that begs to be climbed. John Conner was once quuted in Climbing Magazine, This route is a crest surfing array of Alpine granite, with steep face, slab, finger, hand, and wide cracks.Instead of tackling a specific crack system like most routes in the area, the first ascensionists chose to follow the striking, slender East Buttress itself, giving the route a very exposed feel. Even the last, 3rd class pitch to the summit walks across a knife edged ridge with over 1,000 feet of exposure on either side. Absolutely incredible! The bolt ladders and diverse and extremely exposed nature of the climbing make this route a unique experience. Fred Beckey included the route in his book, Fred Beckeys 100 Favorite North American Climbs. AKA: The Beckey-Leen Photos
- View all 1 photos of Direct East Buttress as: Thumbnails | Slideshow
Climber Beta on Direct East Buttress
Find other routes like
Direct East Buttress
Route History
It was first climbed in July 1968 by Beckey and Doug Leen. The pair scoped the route the year before, hiking to the toe of the buttress after climbing the first ascent of the Serpentine Crack on Liberty Bell. The first ascent required 26 bolts and 68 pitons. While now typically climbed in one day, at the time the routes three-day first ascent push was very impressive. They started in June of 1968 when Beckey and Leen climbed several pitches up the buttress and placed the first of what proved to be many bolts. They left one rope hanging over the hardest and longest pitch (what is now Pitch 3).A month later, they returned. While the pair was ascending their fixed rope, Leen discovered to his horror that some creature had chewed part way through the rope. He had been using jumars to ascend the rope as quickly as he could until he saw the half chewed section above him, at which point, he slowed to a crawl hoping the frayed section wouldnt break. Despite this small setback, by the end of the first day they were back at their old high point just above the ledge they dubbed, Fat Mans Fright. They passed the first night trying not to think about what the critters might do to their equipment. They spent the next day on difficult aid climbing with several sections originally rated A4. Eventually the pair got through this challenging section to the ledge that is now the top of Pitch 6. From there, Beckey spent the rest of the day light drilling a bolt ladder before finally being lowered from a half-drilled bolt to the ledge for the night. When you belay here, imagine the first ascent team sleeping on this small, exposed space. The next day, Leen took over and added two more bolts before moving onto spicy hooks and pitons. He then freed the rest of the pitch using a mantle, which is still, for most, the crux of the route on Pitch 7. Beckey led the last two pitches, including one which he recalls as being, a long risky runout to the summit ridge. Strategy
Expect to share the route with at least one to three other parties on a busy weekend. Mid-week, you have a 50-50 chance of having the route to yourself. Passing is possible on the first two pitches that are lower 5th class. Up higher, passing becomes more difficult, but a few nice, big ledges make it somewhat convenient if the parties in front of you are willing to let you scoot by.Start early. While its not the farthest in distance, this route has the one of the steepest and most demanding approaches of the Liberty Bell group. The route itself is over 1,000 feet long and many people think it feels taller than its ten pitches. The rock at the bottom is of lesser quality than the rest of the route. Pitch 3 is long and demanding and has some sub-par rock on the lower half. Use slings accordingly, especially down low, or be punished by horrible rope drag. Also dont burn all your hand and fist-size gear too early or youll face a runout at the top. The first bolt ladder on Pitch 5 goes free at 5.11, but due to the technical nature of the low angle slab climbing, this pitch is often aided. The fastest way is with one adjustable daisy, and just pulling on slings and stepping in slings and on the bolt hangers. That said, the finger crack in between the bolts on Pitch 5 is super fun and shouldnt be missed. Pitch 6 is more fun, well-protected crack climbing that leads to the large but wildly exposed ledge where the first ascent teamed spent their second night. The second bolt ladder is steep and free climbing it feels like a sport climb in a wickedly exposed setting. This pitch is quickest to ascend by a mix of free and aid. While many other books label this pitch A-0, if you dont have etriers, there will be a few mandatory free moves to reach each bolt, including a committing and strenuous but well-protected mantle that Leen did on the first ascent in 1968! The route finding on the last couple of pitches gets a little tricky. A technical descent with a lot of mandatory down climbing and tough-to-spot rappels is even more difficult if you are in the dark. The route goes into the shade at noon, is often windy and is colder than most in the area. You dont want to leave anything at the bottom because it is a big pain to return to. Instead, carry all your gear up and over the route. Retreat Storm
For the first four pitches, the route can be rappelled without much problem with two 60m ropes from slung blocks and trees. After the first Bolt Ladder that traverses over to the other side of the buttress, retreat becomes significantly more difficult and the fixed anchors disappear. Descent from higher on the route would certainly involve two ropes, losing a lot of gear and a bag full of trickery. The east face is also colder than you might imagine, especially earlier and later in the season.
Everything You Need to Know About
Washington Pass
Search the internet for beta on
Direct East Buttress
|
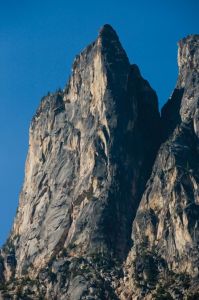 The soaring East Butress of South Early Winters Spire Photo: Andrew Burr
Other Routes on South Early Winters Spire
|