The Hitchhiker, South Early Winters Spire IV 5.11b or 5.10d C1 |
||
Washington Pass, Washington, USA | ||
|
Avg time to climb route: 5-9 hours
Approach time: 1.5-2.5 hours Descent time: 1.5-2.5 hours Number of pitches: 9 Height of route: 900' Overview
The Hitchhiker is a modern classic using a mix of bolts and traditional protection. The result is possibly the best route for its grade, not only at Washington Pass but in the entire state. With spectacular climbing on flawless rock, The Hitchhiker is well-protected, clean, and has the awesome and slightly ominous feel of a big wall. The route is consistently difficult with almost every pitch being rated 5.10 or 5.11, and its a great route for 5.10+ climbers looking to break into the 5.11 realm.The south face of South Early Winters Spire is one of the warmest walls in the Washington Pass region, meaning it dries early in the season and stays warm late into the fall. The route is easier and less sustained than The Passenger, and the climbing style is different as well. The Passenger has lots of steep crack climbing with a powerful crux and only small, short sections of face climbing with very few lead bolts. The Hitchhiker is mostly steep, technical face climbing with lots of lead bolts and only occasional sections of crack climbing. Regardless, both routes are spectacular and are worth doing again and again. Climber Beta on The Hitchhiker
Find other routes like
The Hitchhiker
Route History
The Hitchhiker was first climbed by Bryan Burdo and Scott Johnston in 2007. Burdo, with hundreds of first ascents to his credit, said he had his eye on the rock 250 feet to the right of his classic Washington test piece, The Passenger, for several years. However it wasnt until Burdo and Johnston where going to climb the Direct East Buttress on South Early Winters Spire in the summer of 2006 that they found themselves looking over at the features to the west. The pair abandoned their plans to climb the DEB and made their climbing day a reconnaissance trip on the lower part of what would be The Hitchhiker. Burdo and Johnston knew they had found something good and felt they had to keep it under their hats and not let many people know about it. The pair started ground up onsite. The line originally started a ways to the right, but after further reconnaissance the route moved to where it is today. They proudly placed bolts on lead for the first two thirds, leading everything onsite and ground up. The first half of the route was pretty clean and didnt need extensive scrubbing. The final three pitches were steeper and dirtier and required much more cleaning, so they rappelled in to scrub and brush them and place bolts while on rappel.The whole process was spread out over the course of several days during the summer and took about a weeks worth of time. The route was put up in a hybrid of top down and ground up styles, similar though in opposite order to The Hitchhikers neighbor, The Passenger. The Passenger was pre-inspected on the lower half and onsited on the upper half, while the ascent of The Hitchhiker was done the other way around. Burdo and Johnston named their route The Hitchhiker partly because you can see the highway and the hairpin turn for most of the route, and also because of its proximity to the car-riding theme-named The Passenger, which is also named for the view of the highway. In addition, Burdo and Johnston saw this route as hitching features together between the Passenger and The Inferno route. Strategy
Almost every pitch is 5.10 or 5.11, which keeps the crowds away. However, this is now a classic, and it is not uncommon to share the route with another party on a busy weekend. While you can pull through all the 5.11 cruxes on gear, you should be a solid 5.10 climber to enjoy this route. It is a great route for a 5.10+ climber wanting to push their way into the 5.11 world. The route is long, but because of bolted anchors and the straightforward nature of the climbing, the route climbs incredibly fast for those up to the difficulty. If youre comfortable with a small runout on 5.8 terrain, you can leave the 5 cam at home. The first few pitches are awesome mostly face climbing on a mix of bolts and traditionally placed gear for protection. Some crack climbers might find the short C shaped Pitch 5 to be the crux. It involves a series of insecure steep and cryptic slab moves, but is very well-protected and the hardest sections are easily aided. The 5.11b crack is short, protects well and has a clean fall. The key is to not put the gear where you need to put your hands. Put the gear in at waist level and punch it. Pitch 8 is steep and spectacular and the 5.11b/c crux is super short and protects with a bolt at your head. On top of Pitch 8 you can traverse out left to escape but this is NOT recommended. It is super dirty and scary. The 9th and final pitch shouldnt be missed. Whether to carry all your gear up and over depends which way you approach the base. The scree-covered hairpin approach is so unpleasant that Id rather approach from Blue Lake and walk the extra distance with similar elevation gain on nicer trails. A good plan would be to hike from Blue Lake, rack up and leave your gear at the base of the South Arête and hike ten minutes down a loose gully to the start of The Hitchhiker in your rock shoes. When you finish descending the South Arête, youre at your gear and ready to cruise down to Blue Lake Trailhead. You can also hike and scramble up to the base from the hairpin, leave your shoes at the base, descend the South Arête and scramble back down to your gear and reverse your approach to the hairpin. Retreat Storm
You can rappel the route with one 60m rope from the top of the 7th pitch. This route dries extremely fast, and along with the South Face of Big Kangaroo, is one of the warmest walls included in this book. It comes into shape early in the season and stays warm late in the year. It can be a too hot during the warmest days of the summer. From the top of Pitch 7, you can escape on a very nasty, dirty ramp system but this is far scarier than it sounds, and is not recommended.
Everything You Need to Know About
Washington Pass
Search the internet for beta on
The Hitchhiker
|
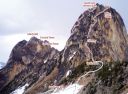
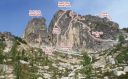
 South Early Winter Spire Photo: Ian Nicholson
Other Routes on South Early Winters Spire
|